
How To Fade A Picture In Powerpoint

Powerpoint 2016 Animations
www.lynda.com

Ppt Animation If Needed Is Fade Very Fast Powerpoint Presentation Id 3858476
www.slideserve.com
Looking Sleek With Smooth Powerpoint Transitions Brightcarbon
www.brightcarbon.com
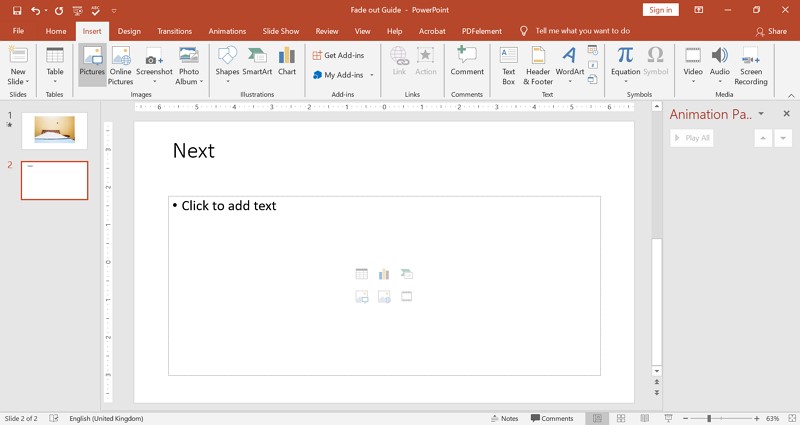
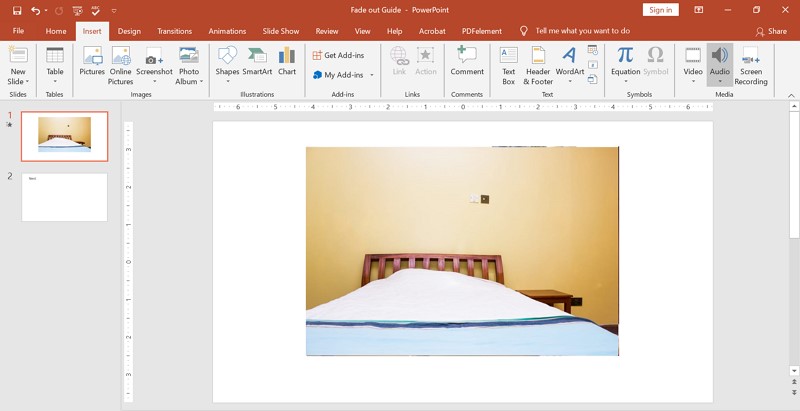
How To Fade Picture And Music In Powerpoint
pdf.wondershare.com

10 Simple Powerpoint Animation Tips And Tricks
business.tutsplus.com
What S New In Powerpoint 2019 Presentationpoint
www.presentationpoint.com
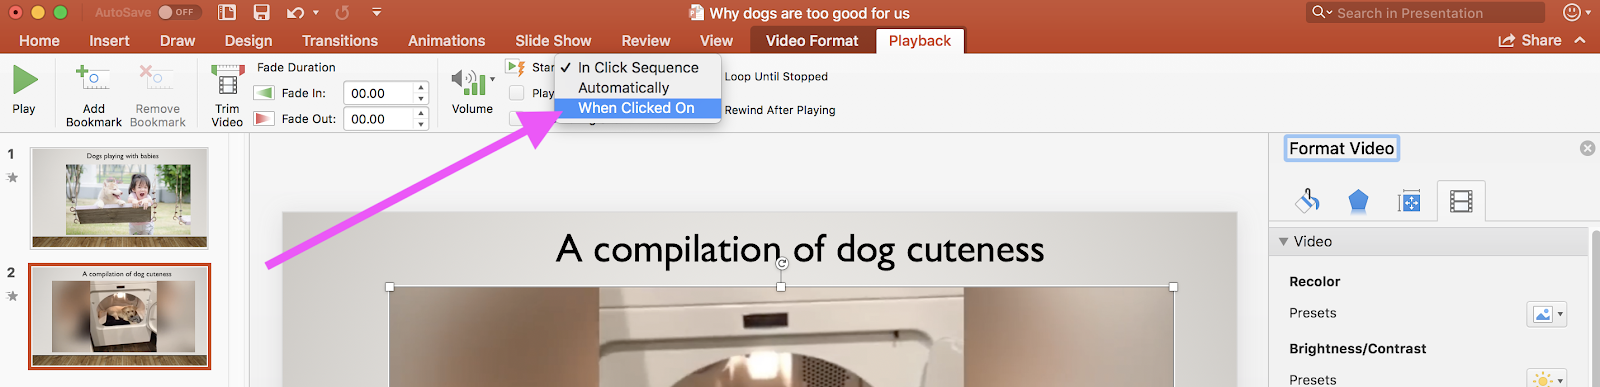
In powerpoint head to view slide master.
How to fade a picture in powerpoint. Go down to the gradient stops. How to fade picture in powerpoint step 1. Heres the step by step guide for powerpoint 2010 and later.
They add visual interest but because theyre faded a bit they wont dominate or distract from your slide content. After that click on the images and head to animations and choose the fade option. A file explorer will open up at this.
With the shape now on top of the image right click on the shape and select format shape. Typically i use the image fading technique in two ways. Under the fill tab select gradient fill.
In powerpoint use file insert to put the picture on a slide. You can make one color in a picture transparent to hide part of the picture or create a layered effect. Step 2 choose an appropriate shape and size.
Right click the rectangle and select format shape from the context menu. First you can use. How to fade a picture in powerpoint fade a picture in powerpoint.
Use insert shape to draw a shape over the area you want to blur. Click on insert and then click the pictures option. Select fill picture or texture fill and click on insert picture from file.
Transparent or faded images watermarks are great to use as slide backgrounds in a powerpoint presentation. On the format tab select shape fill eyedropper. Select the picture or object for which you want to change the transparency.
To add a picture to a slide and change its transparency go to insert and pick a shape. By default you have three gradient. Image fading technique in powerpoint step 1 identify where a fade is required.
Drag the transparency slider circled in green int he picture below rightward to set the exact percentage of transparency you want. Use the transparency. Step 3 add a.
Fade a slides background. To choose an image file. Add faded background.
I used a long narrow rectangle for this fade effect. Add a rectangle shape to the slide.
Powerpoint Looping Cross Fades
www.pptalchemy.co.uk

How Do I Fade In An Object From Half Transparent To Opaque In Powerpoint 2010 Super User
superuser.com

How To Embed A Youtube Video In Powerpoint On Or Offline
learn.g2.com
Jazzing Up Your Powerpoint Presentations With Transitions One Minute Office Magic
oneminuteofficemagic.com

15 Powerpoint Hacks That Will Help You Save Hours And Wow Audiences
visualhackers.com

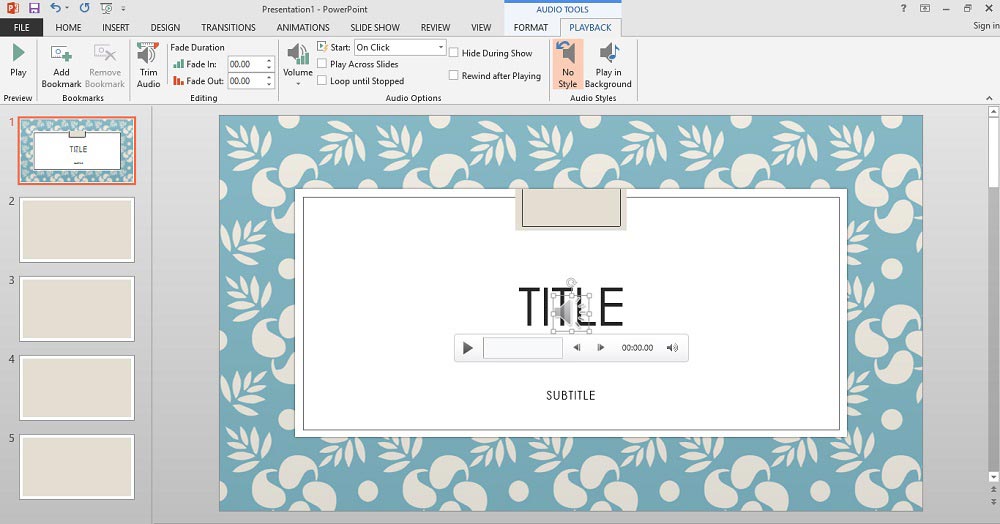
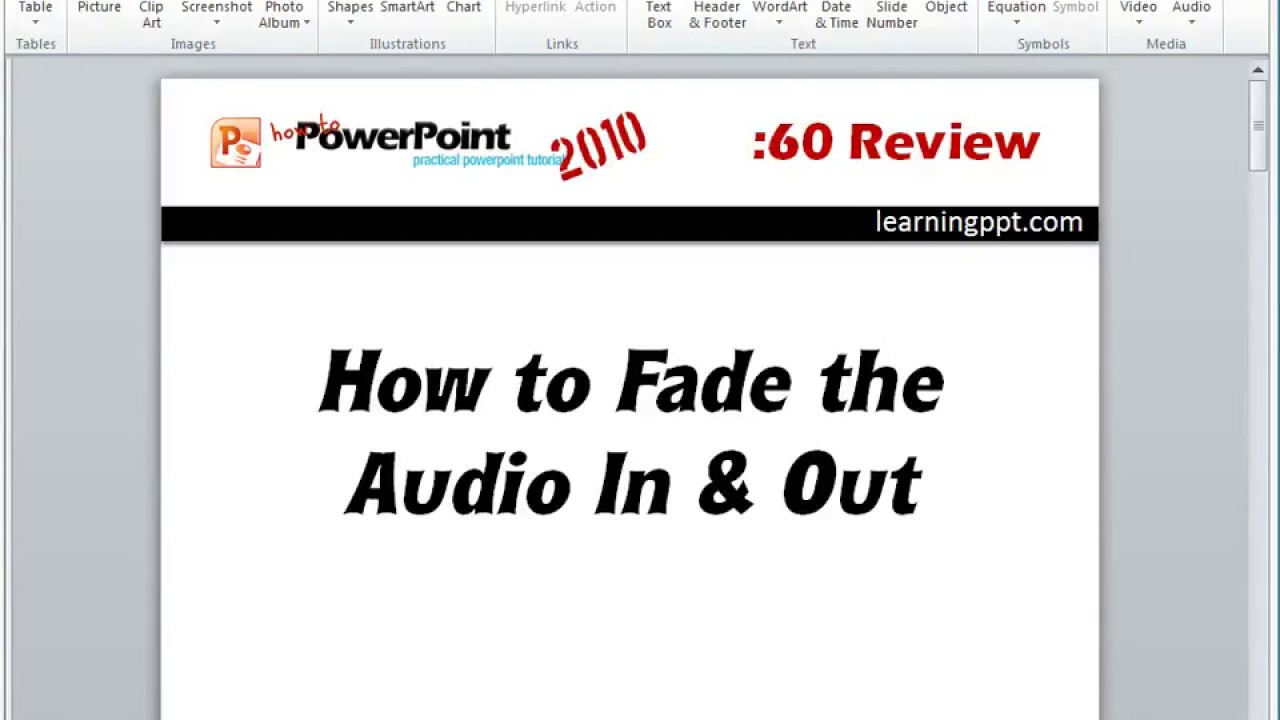
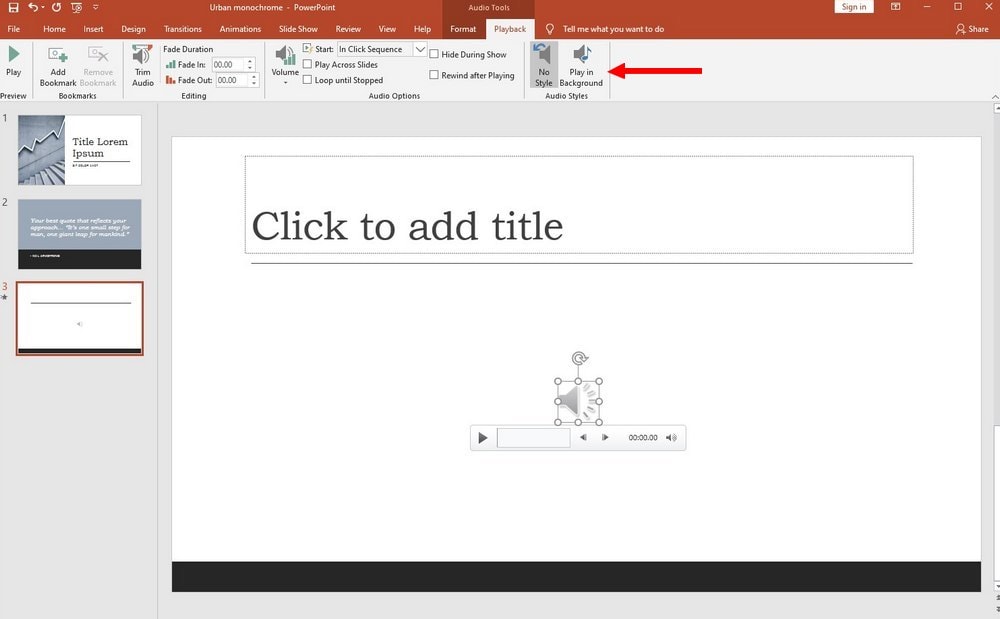
Fade Effect For Audio Clips In Powerpoint 2013 For Windows
www.indezine.com
How To Animate Images Text And Other Objects In Powerpoint
www.avantixlearning.ca
How To Add Music To A Powerpoint Presentation Business Insider
www.businessinsider.com
Http Teacherlink Ed Usu Edu Tlresources Training2 Powerpoint Adding A Video To A Powerpoint Presentation Pdf
:max_bytes(150000):strip_icc()/2_edit-music-sound-or-other-audio-settings-in-powerpoint-3-5c60371bc9e77c00010a49c2-638b561769d24f288b6909e0182a3f68.jpg)
Edit Music Sound Or Other Audio Settings In Powerpoint
www.lifewire.com

Image Fading Technique In Powerpoint Powerpoint Ninja
www.powerpointninja.com
Animated Picture Fade Effect Powerpoint Template
www.free-power-point-templates.com

How To Add Music To Powerpoint Presentations
www.online-tech-tips.com
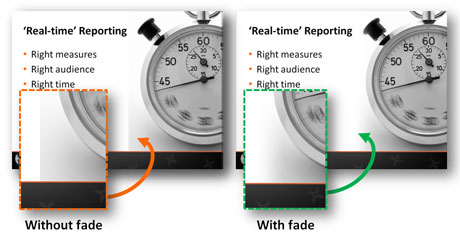
Image Fading Technique In Powerpoint Powerpoint Ninja
www.powerpointninja.com
How To Embed A Youtube Video In Powerpoint On Or Offline
learn.g2.com
13 Time Saving Hacks For Better And Prettier Powerpoints Ezcomputer Solutions
www.ezcomputersolutions.com
Why Is My Powerpoint Stuck In The First Slide Smart Simple Signage Solution For Businesses Homes
www.huddlefly.co

Animation Fade In Out Powerpoint Youtube
www.youtube.com

Fade Effect For Video Clips In Powerpoint 2016 For Windows
www.indezine.com

Catch Up Office 2010 Powerpoint Video Allan J Smithie
allanjsmithie.wordpress.com

How To Fade Photos In Powerpoint Youtube
www.youtube.com

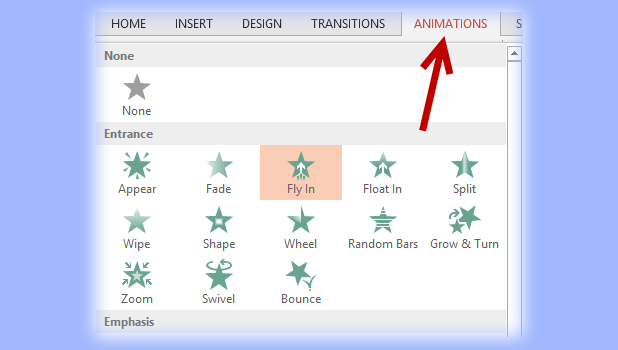
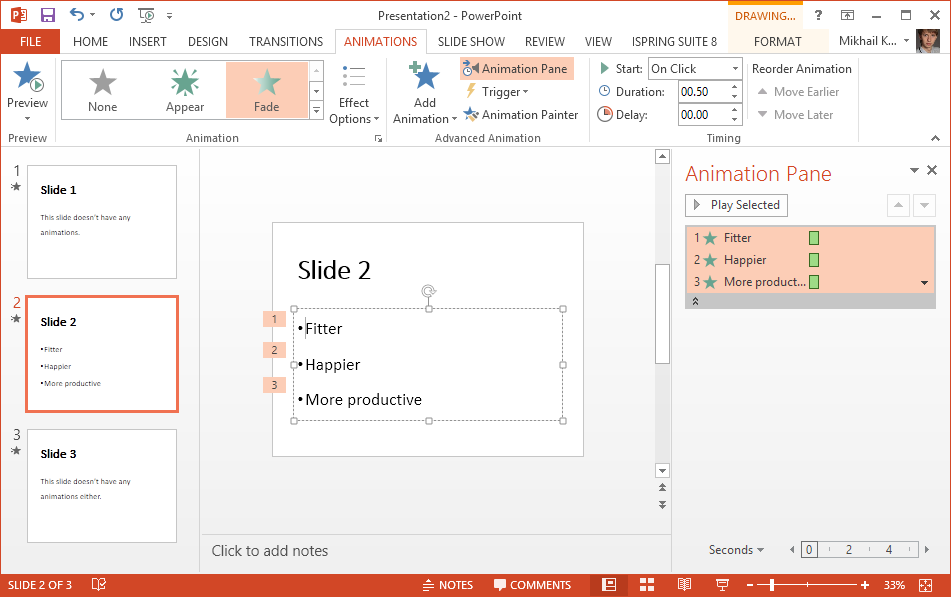
Entrance Animations In Powerpoint 2016 For Windows
www.indezine.com

How Do I Fade In An Object From Half Transparent To Opaque In Powerpoint 2010 Super User
superuser.com
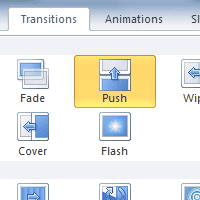
What Is A Transition
www.computerhope.com
Powerpoint Transition
www.electricteacher.com
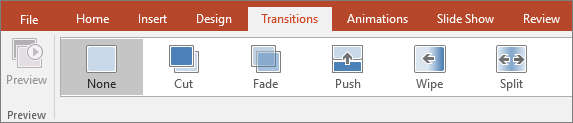
Add Change Or Remove Transitions Between Slides Office Support
support.microsoft.com
Powerpoint Change Animation Direction
www.tech-recipes.com

Showing Bullet Points One At A Time
dlthede.net
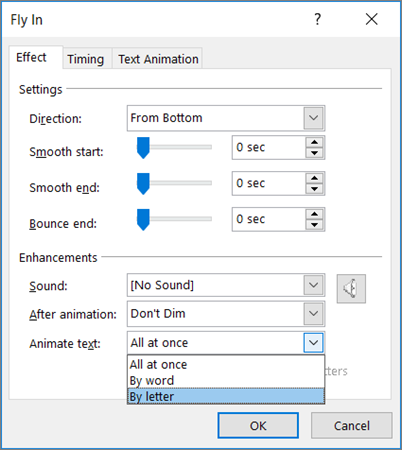
Animate Or Make Words Appear One Line At A Time Office Support
support.microsoft.com

Image Fading Technique In Powerpoint Powerpoint Ninja
www.powerpointninja.com
How To Fade In A Video On Powerpoint Youtube
www.youtube.com

Create A Fade Effect On An Image In Powerpoint Youtube
www.youtube.com
Image Fading Technique In Powerpoint Powerpoint Ninja
www.powerpointninja.com

Screen Recording In Powerpoint 2016 For Windows Powerpoint Screen Windows
in.pinterest.com

How To Fade A Background Image In Powerpoint Youtube
www.youtube.com

Insert Video In Powerpoint Instructions And Video Lesson
www.teachucomp.com

Fade Effect For Audio Clips In Powerpoint 2016 For Windows
www.indezine.com

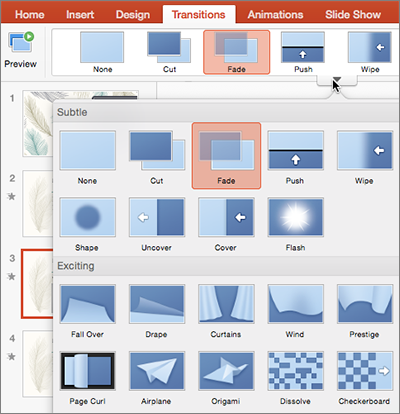
Powerpoint Transitions Fade
www.indezine.com
Animation In Powerpoint Too Cool Or Too Much Laura M Foley Design
www.lauramfoley.com

How To Add Animations To Powerpoint Present Better
24slides.com
How To Make A Photo Transparent In Powerpoint Quickly
business.tutsplus.com

Fade Effect For Audio Clips In Powerpoint 2010 For Windows
www.indezine.com
Http Www Copyright Com Crc Wp Content Uploads Sites 2 2015 03 Using Videos In Presentations Pdf
The Best Slide Transitions And Animations For Your Business Presentations Present Better
24slides.com
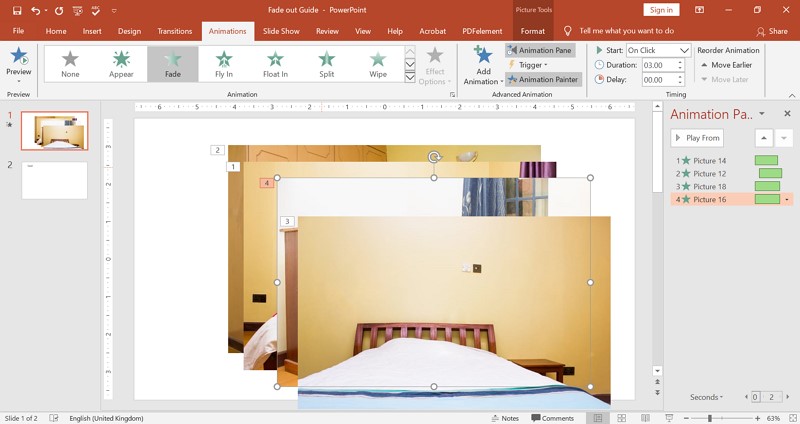
Powerpoint Fade In And Out
www.pptalchemy.co.uk

0514 James 111 The Rich Will Fade Away Powerpoint Church Sermon Powerpoint Presentation Designs Slide Ppt Graphics Presentation Template Designs
www.slideteam.net

Powerpoint 2016 Inserting Videos
edu.gcfglobal.org

Adding Entrance And Exit Animations To An Object E Learning Heroes
community.articulate.com
Http Www2 Eit Ac Nz Library Documents Working With Powerpoint Combined Pdf
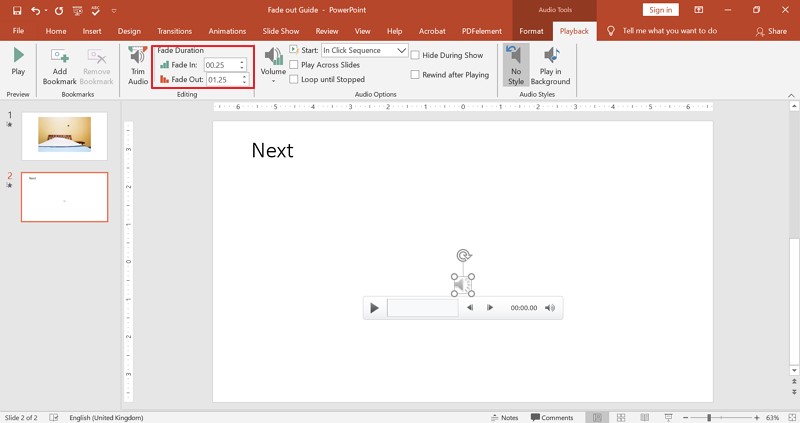
How To Fade Picture And Music In Powerpoint
pdf.wondershare.com

Microscopes Fade Background For Powerpoint Health And Medical Ppt Templates
www.pptbackgrounds.org
Understanding The Presentation Timeline And Animation Steps
www.ispringsolutions.com
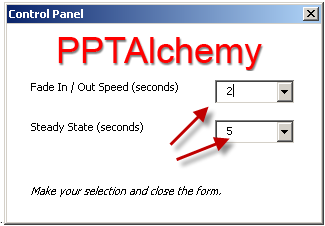
Amazing Powerpoint Techniques Hints And Tips Partial Fade
www.pptalchemy.co.uk

Powerpoint 2016 Automatically Advance Presentation Slides
www.technipages.com
Add Change Or Remove Transitions Between Slides Office Support
support.microsoft.com
11 Free Animated Powerpoint Templates Edit Download
visme.co

How To Control When A Picture Appears In Powerpoint
www.howtogeek.com
How To Add Music To A Powerpoint
www.techjunkie.com

Fade Effect For Audio Clips In Powerpoint 2013 For Windows
www.indezine.com

Powerpoint Zoom Animation Effect Pro Trick
nutsandboltsspeedtraining.com

How To Get A Photoshopped Look By Fading In An Image
www.ellenfinkelstein.com

How To Add Music To Powerpoint At T Developer
developer.att.com
How To Make A Photo Transparent In Powerpoint Quickly
business.tutsplus.com

Vlypwqvgyrywpm
How To Apply Transition Effects In Powerpoint 2013 Free Powerpoint Templates
freepowerpointtemplates.com
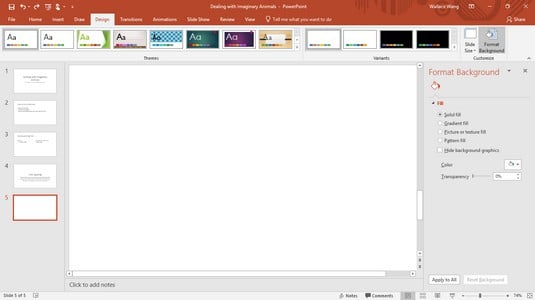
How To Change The Background In Powerpoint 2019 Dummies
www.dummies.com

Fading Slideshow Powerpoint
jyduxemamiwymevid.makomamoa.com

Ppt In Slide Show Mode Slides Advance Automatically Fade In Fade Out Enjoy Powerpoint Presentation Id 7095639
www.slideserve.com
How To Create Audio Transitions Fade In Out In Powerpoint Youtube
m.youtube.com
Https Encrypted Tbn0 Gstatic Com Images Q Tbn 3aand9gcsy1lxtuypsmin6dhguhfqoo4upc93h6q63llke4htyrnuknenp Usqp Cau
encrypted-tbn0.gstatic.com
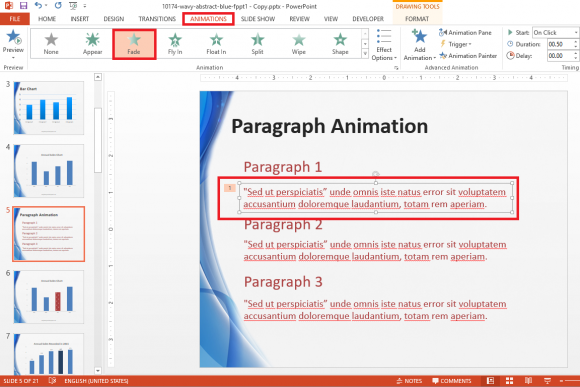
Use Animation To Make Paragraphs Appear Free Powerpoint Templates
freepowerpointtemplates.com

Fade Effect For Audio Clips In Powerpoint 2016 For Windows
www.indezine.com

Fade Images In Powerpoint Without The Help Of Photoshop
www.guidingtech.com
:max_bytes(150000):strip_icc()/create-a-watermark-on-powerpoint-R3-5c2389a046e0fb0001c60733.jpg)
Create A Watermark On Powerpoint Slides
www.lifewire.com
How To Make A Photo Transparent In Powerpoint Quickly
business.tutsplus.com
How To Add Text Transitions In Powerpoint 8 Steps With Pictures
www.wikihow.com

Powerpoint Bullet Points Fade In One After The
technical-tips.com
Https Encrypted Tbn0 Gstatic Com Images Q Tbn 3aand9gcqxzmocwah5xut0lnevfok5gwmizly8plv Rdkxba8 Usqp Cau
encrypted-tbn0.gstatic.com
How To Fade Picture And Music In Powerpoint
pdf.wondershare.com
Https Encrypted Tbn0 Gstatic Com Images Q Tbn 3aand9gctb1t8uanehujr2sppgocv2qvvbrq9hclziy4xrl3j2v Vefg72 Usqp Cau
encrypted-tbn0.gstatic.com
:max_bytes(150000):strip_icc()/Capture-5c03561846e0fb00010f2783-5c035a8f46e0fb000199d5f5.JPG)
Dim Text In Powerpoint Presentations
www.lifewire.com

Morphing Slides In Powerpoint One Minute Office Magic
oneminuteofficemagic.com
The Best Slide Transitions And Animations For Your Business Presentations Present Better
24slides.com
How To Make An Image Transparent In Powerpoint Powerpoint Tips And Tutorials
www.shapechef.com
Use Transparency Gradients
www.ellenfinkelstein.com

Transition Effects Computer Applications For Managers
courses.lumenlearning.com

Canva Presentation Animation Explained The Powerpoint Blog
www.thepowerpointblog.com

Powerpoint 2016 For Mac Fade Audio Microsoft Community
answers.microsoft.com
Powerpoint 2010 Applying Transitions
edu.gcfglobal.org

Add Change Or Remove Transitions Between Slides Office Support
support.microsoft.com
Https Encrypted Tbn0 Gstatic Com Images Q Tbn 3aand9gctxuzc Ysbr Ri4ffhn93mxcviz9o5zmhinpvwljrxkdfqomnz Usqp Cau
encrypted-tbn0.gstatic.com

How To Get A Photoshopped Look By Fading In An Image
www.ellenfinkelstein.com
Create A Soft Look With Semi Transparent Images In Powerpoint
www.ellenfinkelstein.com
Powerpoint Ultimate Guide For 2020 Theme Junkie
www.theme-junkie.com

How To Add Two Or More Powerpoint Animations To One Object Presentation Xpert
www.presentationxpert.com
How To Fade Picture And Music In Powerpoint
pdf.wondershare.com
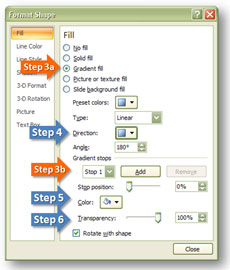
Image Fading Technique In Powerpoint Powerpoint Ninja
www.powerpointninja.com

Https Encrypted Tbn0 Gstatic Com Images Q Tbn 3aand9gcq4spgcpbbv7m6njwfz2g7lwobg Ev7orahug Usqp Cau